
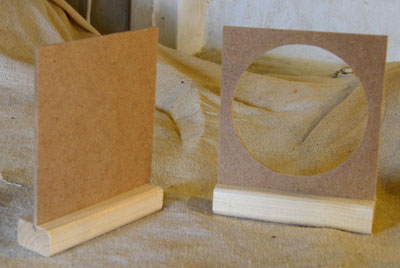
Ducting Parts
Dust Extraction
Introduction
Woodworking is great, but the dust produced isn't - not only does it make your workshop messy, it's not good for your lungs.
This page details a solution to getting extraction to all the machines in a small workshop, and doing so in a way that doesn't risk fine dust escaping back into the working environment.
The Problem
Most extraction systems use filters that are not capable of trapping the most dangerous (tiny) dust particles, except for when they get plugged with debris, at which point the extractor no longer pulls enough air to trap the dust.
For lots of detail on this problem, Bill Pentz's excellent site is well worth your time.
Pentz's solution is to use cyclones, in order to separate the majority of the dust and debris from the finest particles, which can be effectively filtered.
Unfortunately, my workshop isn't that large, and the ceiling height is very low - too low to stand any realistic chance of fitting in a cyclone. In fact, the ceiling is so low that even installing ducting would be difficult.
Pentz's site includes information about suitable ducting sizes and extractor air flow requirements, in order to capture fine dust. This information indicated that I would require a 6" diameter duct to achieve sufficient airflow. Unfortunately, this would result in the bottom of the ducting being lower than the top of my head!
The Solution
My solution was to make my own rectangular ducting from 1/8" sheets of MDF. In addition, one face of the ducting would use clear perspex, so any blockages could easily be seen.
The size of the rectangular ducting was determined using this site, and is 7 1/4" wide x 4 5/8" deep (the small rebates used for strength resulted in an internal size of 7" x 4 1/2").
On the end of each section, I added a flange, made from 1/2" plywood, with holes to allow the sections to be bolted together and hung from the ceiling.
The result was as follows:
Ducting Parts
The results of putting all the ducting together is shown below (note that the tight space in the workshop means that most of the pictures were stitched together from several photos, so any disjoints or missing areas are because of this).

View from the front of the workshop
To the left of the image is a router table, and at the front right is a bandsaw. Behind the bandsaw is a CNC router, with a drill press and disc sander on the back wall.
The following photo shows the back wall. The dust extractor is a Fox F50-843, 3hp impellor unit (claimed 2300CFM). It comes with a 'Y' piece that sits on the top, and connects to two filter bag/collectors. Instead of using the 'Y' and bags, I made an exhaust, which exits through a hole in the back of the workshop.

Rear wall
Like the ducting, the exhaust was 1/8" MDF, and was constructed as shown below:

Exhaust
Out the back of the garage, I made a small shed, into which a bin was placed. The result is quite a mess within the shed, but that's where the dust stays (the mess around it was due to me disturbing dust whilst taking the photos). No extracted air comes back into the garage, so no filters are required. Note there's a vent on the side (just visible in the last of the three photos).

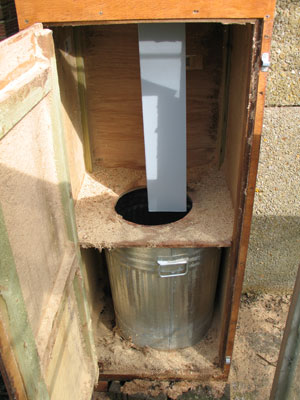

Bin shed and exhaust detail
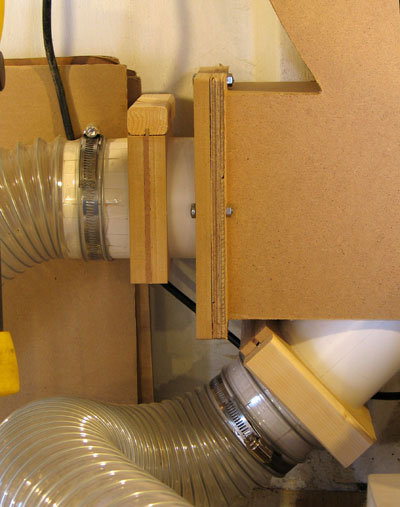
Connecting the extractor to the ducting required some thought. The unit comes with a 'crown' with three 4" ports (or it can be removed, to give a single 6" port). I decided to make an adaptor to take two of the 4" ports, leaving me with a spare 4" port, which is usually left capped.

Extractor to ducting adaptor
Returning to the back wall, the two duct ports have blast gates, and are connected to two lengths of hose. These can be clamped near the drill press, to collect material when drilling, and/or attached to the disc sander. Severe lack of room meant I had to compromise here, and couldn't give myself a fixed connection to the sander.
In the photo, you can see the blast gate plates inserted into the gates, one vertically, the other horizontally.
Rear wall blast gate detail
The photo below shows the view looking from the back of the workshop. You can see that one side of the ducting is made of perspex.
View from rear wall
These next pictures show the drop for the router table (on the right of the above photo). The left image shows the connections. The angled pipe will go to the router table fence (connection not yet made), and the bottom pipe goes into the table, to collect dust around the router bit.
The right image shows the inside of this drop. I've remove the blast gate plate from the bottom pipe, and the angled pipe is pictured with a solid plate (i.e. closed off).


Router table drop
Here you can see the inside of the router table, with the hose connected to the router's extraction port.
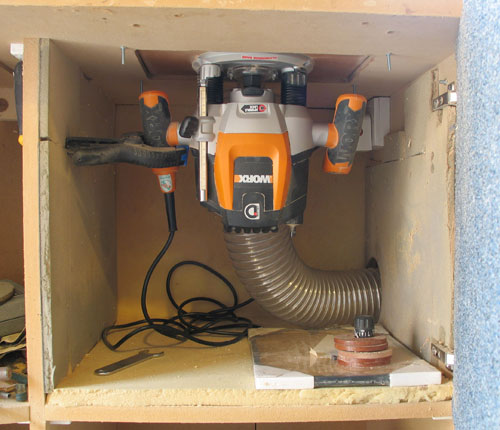
Inside the router table
Here's the detail of the bandsaw connections. I was given a 2 1/2" stayput hose, which does a surprisingly good job of removing dust from the top of the table. The arched section near the blast gate is some scrap that's being used to support the weight of the hose. A better solution is probably required, but it works pretty well at the moment.

Bandsaw connections
Here's a closeup of a blast gate without a plate. When I started to put them together, I realised that I should've made them wider, as the two sides are only held together with the darker coloured strips you can see on either edge. They're a bit weak, but I've not had too many problems. Note also that the edges of the strips are rounded slightly to make sliding in the plates easier.
In the second photo you can see the two types of blast gate plate. Lack of space meant that I had to make separate open/closed plates, rather than single plates with a solid and open section. The backs of all blast gates are open (i.e. they look the same on the back as they do on the front) to ensure that no dust or chips get compressed and caught in the back of the gate.

Blast gate detail
Final Thoughts
So has it actually worked? It certainly appears to! As long as I keep a maximum of two of the blast gates open at any one time, even the bandsaw connections (approx 7m/23ft of ducting from the extractor) pull enough air to 'steal' a 1"x1"x2" chunk of wood from the table... if you're not careful.
I would like to measure the system with a manometer to see if it's really pulling sufficient air, though the real test would be to have the workshop's air checked to see if it's safe when I'm cutting. At the moment, I'm still using a dust mask for extra protection, but it certainly keeps the working areas clean.
I should note that there is some dust in the photos, but this was stuff generated before I'd setup the ducting. I plan to do a good cleanup now that's working.
Also, I'd note that I added a simple gasket to each flange, to prevent any leaks in ducting joins. This accounts for the slight gaps visible in some of the joins, as the gasket pushes the flanges apart slightly.
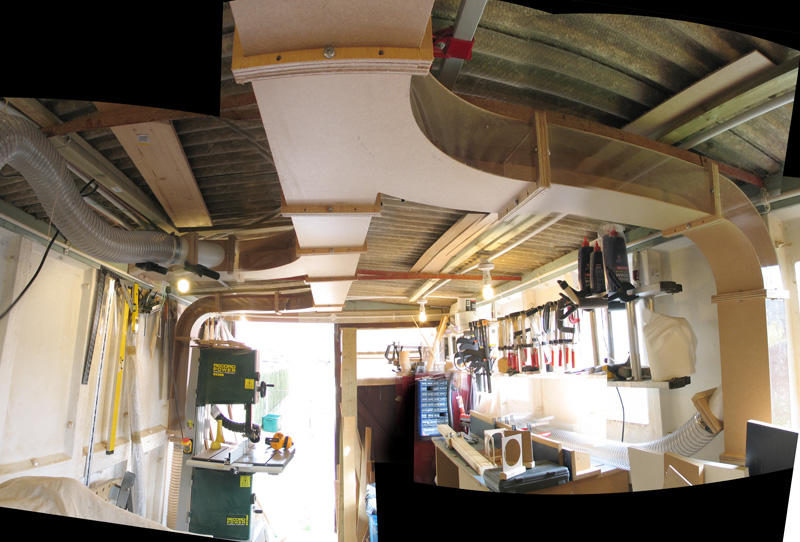
Finally, here's a near 270 degree panorama of the workshop!
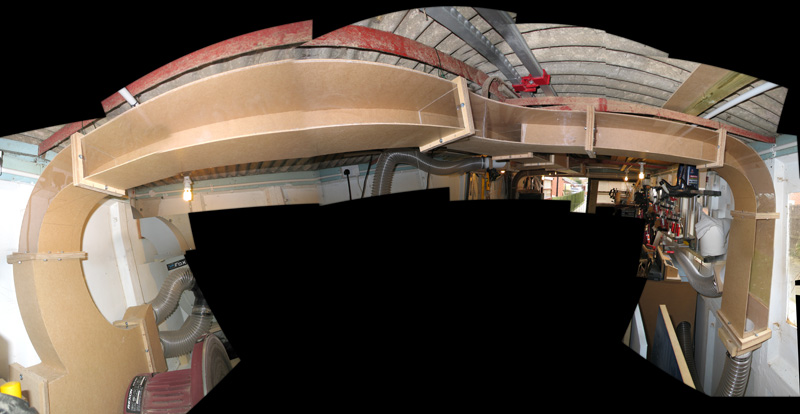
Workshop panorama